Tales of Tools and a Panning Timelapse GoPro Timer.
So what is the best tool in TinkurLab’s workshop? A Dremel! Hands down! Well, 1 minute quick drying epoxy is a close second, but let’s save that for another day.
It can cut. I can grind. It can drill. It can route. It can sand. It can polish. It’s pretty small. You can get new bits cheap.
So how did we get to this epiphany? I recently completed a small project to update my timelapse panning timer – affectionately named TinkurLapse. TinkurLapse rotates my GoPro camera as it takes a photo every few seconds, creating a panning timelapse video. My original timer was basically a $2 Ikea kitchen timer with a ¼”x20 screw glued to it to screw into the GoPro’s tripod mount. BTW a standard camera tripod mount takes a – you guessed it – ¼”x20 screw. Remember that for your next trivia night. Anyway, in the spirit of most Tinkurlab projects, the goal was to get a minimally viable product out the door quickly to start really learning about it and to make improvements. “Learning by doing” in other words.
And learn I did. While the first version of TinkurLapse worked, it had a few issues. First and foremost, having a tiny base, relatively high height, and very light weight resulted in an unbalanced base for the GoPro which easily fell over. Many early experiments resulted in setting the camera up for a 60 minute timelapse only to return after an hour to find the camera lying sideways rotating the timer under its base. Pretty uneventful video! The other issue was its size. While it wasn’t huge, it wasn’t small either. Given that most of my GoPro shooting occurs during travels and adventures like hiking, skiing, etc, it would be ideal to make the panning timer as small as possible. While the first version of the panning timer worked, I didn’t use it very much. It just wasn’t good enough for me. I value it provided didn’t overcome the cost of using it. My goal of creating awesome panning timelapse videos was blocked.
So one day while aimlessly wandering the Internet, I decided to search for a prebuilt device. I know – it was a moment of weakness. How un-DIY of me. There are not very many panning timelapse devices on the market (at least not under less than a few $100s for professional use), but while browsing through the catalog of Photojojo, I came across the Camalapse. However, aside from the $30 price tag, it has the same problem as the first version of TinkurLapse – not stable enough. Camalapse is only 2 ounces, with a small base. A featherweight. However, it does support mounting to a tripod to provide a more stable base, so it has potential.
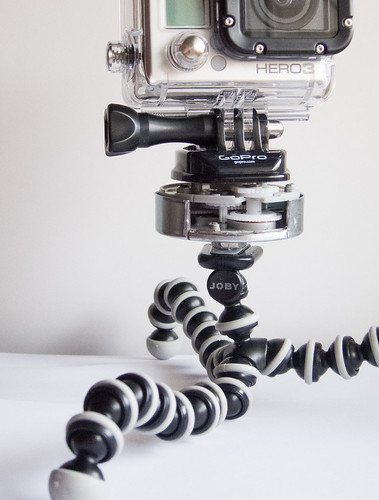
After knocking some sense into myself, I set out to research ways to improve the initial design. I found a great video from a serious panning timelapser, who posted a great tutorial. The tutorial suggested using the same Ikea kitchen timer I used in the first version of TinkurLapse – no problem, I bought 3x just for this reason. The tutorial also had some other great ideas – remove the done bell as to not scare all people and wildlife in 1 mile radius, and mounting the timer to a Gorillapod tripod to provide a more stable base. Perfect!
Enter the Dremel. After some drilling, grinding, and gluing I had completed version two of TinkurLapse. On to testing. The initial test run resulted in rotation of about 90 degrees before stopping. After some investigation, I determined that excess glue and some of the timer’s parts were obstructing the rotation of the GoPro mount. What to do? Dremel it! After some precise grinding and sanding, I had trimmed down the responsible obstructions. The next test passed without issue, even removing the annoying done bell at the end.
TinkurLapse v2 is ready for some more real world testing! I’m looking forward to a few upcoming skiing trips to use the new TinkurLapse. I’ll post some videos. Until then, happy tinkering!
Example Timelapse Video 1
Example Timelapse Video 2
-Adam